Stone Bond Construction Inc.
828.256.7915
  • Home
  • Shop
    • Epoxy Blog
  • Epoxy Stone
  • Vinyl Chip Floor
  • Decorative Concrete
  • Decorative Curbing
  • Contact
  • Epoxy Technical Bulletin

Black Walnut Table Top

11/3/2016

5 Comments

 
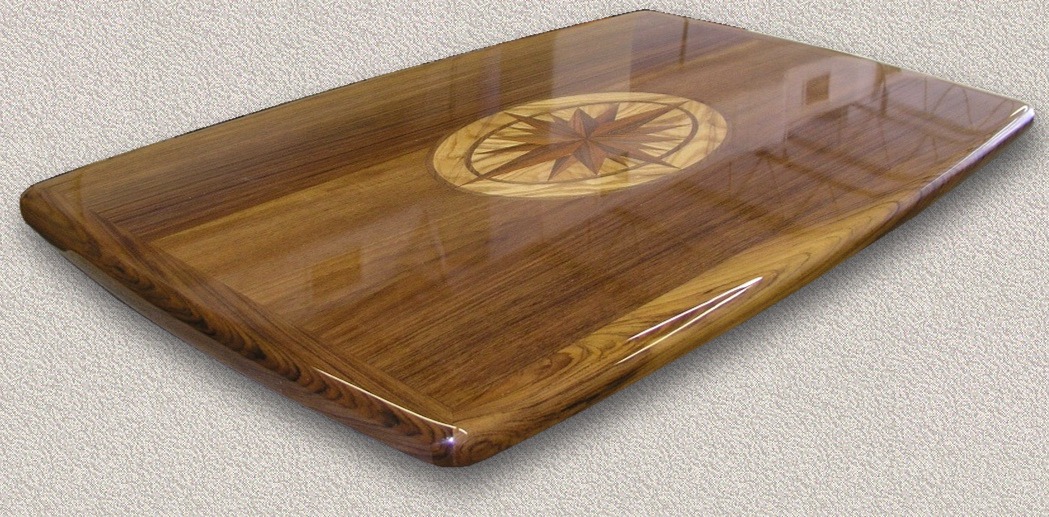
Today we are going to highlight just one of the many projects you can tackle with Stone Bond epoxy. In this video we show the step-by-step process of using Stone Bond epoxy to transform a piece of live edge black walnut. The goal was simple: create a unique and stunning table that you simply could not find in any retail store. The results were better than we could have imagined. With a truly beautiful table top and a pedestal made directly from the tree trunk of a Red Bud tree, this table is unique, gorgeous, and absolutely one of a kind.

​Stone Bond epoxy is versatile and can be used for almost any DIY project that you can think of. Enjoy the video and stay tuned as we show more ways that our epoxy can be used in your projects.
5 Comments

Remodeling With An Epoxy Chip Floor

5/18/2015

2 Comments

 
One of the newest types of flooring that Stone Bond offers is called the epoxy chip floor. The concept is very unique and the look is extraordinary. Epoxy chip flooring is typically placed over existing concrete and it can add the finishing touch to a carport renovation, garage remodel, or any other type of floor surface you might like to change.

Epoxy chip flooring uses multi-colored vinyl chips to cover a floor. the chips are then covered with Stone Bond epoxy and the results are astounding. Here is a quick look at our most recent epoxy chip floor installation. Transportation Insights is moving to the old Lyerly Mills building. The building is over 80 years old and was in major need of a remodel. With over 17,000 sq. ft. of floor space to renovate, Transportation Insights decided to go with an epoxy chip floor.

Before the installation it is important to make sure the surface is clean and free of oil and other debris.
Picture
Picture
One of the most common questions we receive is how we handle issues such as uneven surfaces or expansion joints. Expansion joints are vital to your concrete and we would never simply cover them up. The expansion joints in this floor were filled with a urethane based joint sealer. The uneven areas of the floor were filled with a mixture of sand and Stone Bond epoxy. The sand/epoxy mixture is then troweled smooth and level.
Picture
Picture
Picture
Picture
Once the surface has been leveled the next step is to scrape the floor and remove any foreign objects that do not belong. In this case the floor had areas were adhesive and sheetrock mud were collected. After the floor is thoroughly cleaned it is time to start the chipping process.
Picture
Picture
Epoxy chip floors require several steps for completion. The first step in the installation process is to coat the floor with Stone Bond epoxy. The epoxy is applied with a roller. In order to properly apply the epoxy in small areas or in corners we use a paint brush to apply the epoxy.

Once the epoxy has been applied the next step in the process is to cover the floor in vinyl chips. The chips can be applied by hand but we generally use a hopper gun to ensure a more even distribution of chips.
Picture
Picture
Picture
Picture
Picture
Picture
Picture
Once the chips have been applied to the floor the epoxy must be allowed to dry. We typically allow the floor to dry for 24 hours. Once the floor has set for 24 hours a top coat of epoxy is applied to the floor. This is the step that will ensure the floor is shiny and durable. This final coat of epoxy is applied with a squeegee. The top coat of epoxy will cure extremely hard and will keep the chips from coming up. The finished thickness of this floor is similar to the thickness of a sheet of paper.
Picture
Picture
Picture
The finished floor offers a look unlike anything else on the market. The durability cannot be matched and the color options are truly endless. We have several stock colors to choose from. 
Picture
Picture
Picture
If you have a floor that is in need of a remodel, please consider epoxy chip flooring. You can call our office to schedule an estimate or visit our website to see more examples of the options we offer. 
2 Comments

DIY Epoxy Projects For Your HomeĀ 

4/15/2015

4 Comments

 
Epoxy is an incredible material that you can use around your home for many DIY projects. At Stonebond Construction, we use our proprietary epoxy blend to create beautiful custom patios, pool decking, and floors. There are lots of other ways you can put Stonebond epoxy to work for you! Take a look at some of these DIY epoxy projects and order your epoxy kit to try them in your home.

1. Epoxy Countertops
epoxy countertop
When you want a unique, budget-friendly countertop for your kitchen, epoxy is the perfect solution. You can cover concrete, wood, license plates, bottle caps, or even pennies with epoxy to get a gorgeous one of a kind countertop that will be your kitchen’s shining star for years to come.

2. Epoxy Coasters

epoxy coasters
You can also use epoxy to create coasters. What an incredible gift! Once the epoxy dries, it is waterproof and the perfect material to preserve postcards, mementos, or even photographs to create custom coasters for your friends and family.

3. Epoxy Table

epoxy tabletop
Transform your dining room table with a coat of epoxy to give it a shiny, gorgeous finish and protect it from the normal wear and tear of family life. A basic wood tabletop gets a whole new life with a coat of epoxy. You can create unique designs that will make your family’s dining room table a major conversation piece. You could even use our Stonebond epoxy to create a gorgeous coffee table to give your living room the perfect final touch.

4. Epoxy Floors

epoxy floor
Epoxy flooring comes in all shapes and sizes. Whether you choose river rocks, stamped concrete, or acid stain, epoxy gives it that great finishing sheen that will preserve the beauty and keep your floor looking beautiful for years to come. Epoxy holds up well over time and many of our customers choose epoxy flooring to dress up their basements and garages.

5. Epoxy Art

epoxy projects
If you are the creative type, you could make an endless number of art projects with epoxy. Preserve a beautiful piece of woodwork to display over the fireplace or show off your collection of rare coins. Epoxy is a great way to seal any piece of art and give it that final touch to make it really beautiful and ready to display in your home or office.

These are just a few of the many ways you can put epoxy to work in your home. Get started today by order one of our Stonebond epoxy kits.

4 Comments

Epoxy Stone Pool Deck

9/15/2014

18 Comments

 
Pools are great places for friends and family to gather. The fun is endless and the memories can last for a lifetime. The most common decking that you will find around an in ground pool is concrete. While concrete can be colored, stamped, and covered with numerous materials, there is no denying the amazing look of epoxy stone.

There are a few things to keep in mind about concrete. First, concrete is going to crack. There is no way around this. While the cracking can be minimized the subtle movements of the ground will lead to cracks. Second, concrete is going to discolor due to environmental issues. Our epoxy stone decking has the ability to reinvent your pools deck as well as beautify the area like nothing else.

Here is a great example of a pool deck that was in major need of rejuvenation. This deck was cracked in several places and severally discolored. In addition, this deck had what is known as a cantilever edge. This type of edge is unique since the concrete actually rolls over the edge of the pool. In most new installations the concrete is placed next to the pool coping. Cantilever pool decks can be very difficult to work with and requires a specific type of form and experience. 

In the following pictures you will be able to see a step-by-step example of how epoxy stone is installed as well as the many steps required to prepare the concrete for the installation of the epoxy stone.

BEFORE:
Picture
Picture
Picture
THE PROCESS:
Picture
Cracks in the concrete can and will transfer into any other products that are placed over the concrete unless the proper precautions are taken. All cracks need to be ground out, coated with epoxy, covered with a fiberglass mat, and then coated once again with epoxy.
Picture
Picture
Picture
Loop locks are used to fasten the pool cover to the pool deck. In order to maintain the proper level of the loop locks we remove the loop locks and replace them at a height of approx. 1/2 inch higher. This allows the loop locks to remain useable. 

FORMING:
Picture
Picture
In order to add additional strength to the forms, metal ties are placed into the forms and then secured into the concrete.
Picture
Next, the edge of the pool deck is formed. These forms have been coated in wax so that they will not stick to the epoxy stone. These forms are secured with tap-con screws.
Picture
Once the concrete has been completely formed and prepared for the installation of the epoxy stone, all edges are coated with epoxy. This "double-coating" with epoxy will add strength to the edges and help reduce the likelihood of future breaks.
Picture
INSTALLATION:

Epoxy stone is mixed in 150 pound batches. 3 fifty pound bags of rock are mixed together with 1 gallon of epoxy. Our epoxy is a 2-part blend of hardener and resin and is mixed in 1:1 ratio. Stone Bond uses our own unique proprietary blend of epoxy on all of our epoxy flooring installations.

Picture
Picture
Picture
Picture
The epoxy stone is capable of being poured at any depth in order to level any unevenness that might exist in the concrete. However the typical depth of the stone is approx. 1/2 inch.
Picture
The stone is placed inside the cantilever form and then an edging tool is used to round the edge. 
Picture
Picture
Picture
THE FINISHED PRODUCT:


After the stone has set over night, the final steps in the installation can begin. The forms are removed from all edges. All expansion joints are cut into the stone using a diamond blade concrete saw. These saw cuts will be virtually invisible and they will allow the concrete to move without breaking the stone.
Picture
Picture
As you can see the pool deck has been completely rejuvenated and transformed. This entire process was completed in 2 days. Epoxy stone can be used in almost any place in or around your home. We regularly install epoxy stone on patios, porches, steps, walkways, carports, driveways, and garages. Our epoxy stone can also be installed in basements or any other area of your home.

If you would like more information about epoxy stone please call our office at 828-256-7915 and set up a time for your no cost estimate. You can also see more pictures of our work in the gallery section of our website.
18 Comments

Give Your Garage an Overhaul with Epoxy Chip Flooring

9/3/2014

17 Comments

 
The garage can be known for many things. However it is pretty rare that a garage would be known for having an amazing floor. Most garages are dirty, smelly, and they often have oil/grease spots all over them. However there are some homeowners that choose to revamp the look of their garage and they typically start with the floor.

There are many different options available for garage flooring but we think we have the best application on the market. Our vinyl chip epoxy floor is cost effective, long lasting, easily cleaned, and comes in a variety of colors. While there are several "epoxy floor kits" available from home improvement stores, none of these kits will compare to ours. 

Our flooring is installed with commercial grade, non-diluted, Stone Bond epoxy. Many of the DIY epoxy floor kits available in local home improvement stores are not commercial grade and their epoxy is water based. This leads to a weaker bond and and a much weaker epoxy. 

Additionally, our chips come in a variety of colors and they are all 100% vinyl. By using vinyl chips, instead of paint chips, we are able to safeguard against color loss and prevent the long term degradation of the chips themselves.  

Here is a quick look at a garage floor we recently completed in the Hickory NC area. If you would like more information regarding our epoxy chip floors or any of our other products, please contact us here or call 828-256-7915.
Picture
The garage floor has been power washed and now our team begins scraping the surface to remove any loose material.
Picture
Any holes, cracks, or divots in the existing floor are covered and smoothed with epoxy. This ensures the imperfections do not transfer into the new chip floor. 
Picture
Stone Bond Epoxy is then rolled onto the garage floor. This is the base coat that will allow the vinyl chips to adhere to the concrete.
Picture
Next, vinyl chips are applied using a hopper gun. This ensures the floor is evenly covered with vinyl chips.
Picture
The garage floor overhaul is beginning to take shape!
Picture
Once the floor is completely covered in chips, we allow the epoxy to dry overnight. 
Picture
After the floor has dried, the chips are then scraped and the floor is vacuumed. Scraping will remove any loose chips and it will also keep the floor from having any sharp or obtuse spots. This leads to the final step...
Picture
Last, we apply a top coat of Stone Bond epoxy. This top coat will add strength to the floor and it will also add a "wet" sheen.
Picture
Picture
As you can see, the garage floor is smooth and 100% overhauled. You can have a floor just like this one in your garage. Call us today to schedule your free estimate!
17 Comments

Backyard Transformation

5/1/2014

2 Comments

 
Spring has sprung! As the weather warms and the days last a little longer, families are enjoying the chance to spend more time outside. The opportunity to enjoy the backyard is great but it often reminds us that there are many, many things that we would like to change or repair. 

Over the past week we have had the opportunity to bring some life and excitement back to one backyard. This backyard consisted of a small, brick paver, patio. Apart from the patio there was little more than grass. This family wanted a space that would allow them to entertain, relax, and add some beauty as well.

This project had several requirements as well as a few challenges. For this backyard transformation we installed a completely new stamped concrete patio with drainage system, decorative block wall, decorative steps, and a river rock walkway with concrete stepping stones.

Here are a few before and after pictures of the project. 
Picture
Picture
Picture
Picture
Picture
Picture
Picture
Picture
Picture
Picture
To view more pictures of our work please see our gallery. If you would like to schedule a no cost estimate on your next project, you can call our office at 828-256-7915 or you can contact us via email here on the website. 
2 Comments

The Forgotten Area Of Your Home

4/14/2014

13 Comments

 
Picture
There are several areas around your home that receive continual attention. These areas are easy to see, easy to work on, and they offer some of the biggest changes in your home. 

Yet if you take the time to study your home, you will undoubtedly find a few areas that are routinely neglected. One of the most overlooked areas of a home is the driveway. Some driveways are made of asphalt and others are concrete. Some driveways are made of gravel and still others are simply dirt and grass.

The driveway is one of the most noticeable areas of your home and it is also one of the areas that can add the most curb appeal. If you are looking to add a touch of class or if you just want to improve the overall look of your home, consider remodeling your driveway.

Our most recent project has had us removing and replacing an older driveway. This driveway was made of concrete, it was cracked all over, and it simply looked ragged next to this beautiful home. In order to transform this driveway we had to remove the old concrete and pour a new drive.

The new driveway has 2 distinct characteristics. First, the main drive is plain, regularly finished concrete. However the edges were stamped and colored differently from the main section. Additionally, this border was extended onto the existing walkway. Here are a few pictures:

Picture
Picture
Picture
Have you considered remodeling your driveway or walkways? Have you thought about the many possibilities? We have several options that could radically change the way your home looks. From epoxy stone decking to stamped concrete, you will definitely find something that stands out and makes a difference. 

If you would like to speak with one of our specialists, or if you would like to receive a free estimate on your next project, please call our office at 828-256-7915.
13 Comments

Ready For Spring

3/11/2014

0 Comments

 
Picture
This past weekend saw the annual Home and Garden show at the Hickory Metro Center in Hickory, N.C. We have been a proud member of this group for over 25 years. 

As the weather begins to warm and the days begin to last longer, the time for home improvement is quickly arising. What are your plans for your home this spring? 

The annual project of repainting the porch or the garage floor no longer has to consume your life. Instead of painting your concrete flooring why not cover your existing floor with beautiful epoxy stone or stamp overlay? Epoxy chip flooring is also a great option.

Perhaps you are looking to add a new feature to your yard such as decorative curbing. Curbing is a great option that can really make your home stand out. Curbing can be placed around your flowerbeds, trees, driveway, or you could design your own feature in your yard.

These options were all discussed this past weekend with hundreds of visitors to the Hickory Home and Garden show. For those that were able to make the event, thank you for taking the time to stop by our booth and to share your thoughts. We are as excited for the coming spring as you are. Not only does the weather warm but the opportunity to help homeowners is renewed. 

Whether you choose epoxy stone, epoxy chip flooring, stamp overlay, stamped concrete, or even decorative curbing, you are going to be excited with the outcome of your spring project. So what are you waiting for?

If you are interested in receiving a free quote on your next project, please do not hesitate to call our office at (828) 256-7915. We will be more than willing to explain every option that we offer. 

Picture
0 Comments

A Step-By-Step Guide To Decorative Concrete Installation

1/27/2014

58 Comments

 
Decorative concrete is a great option for pool decks, patio’s, porches, driveways, and sidewalks. While we are accustomed to the process involved in installing decorative concrete, many of our customers are very interested in how this installation is achieved.

Our latest project was for the City of Hickory and the Hickory Crawdad’s baseball team. This project consisted of installing two new walkways and then stamping the concrete with an antique brick pattern.
decorative concrete
The first step in the installation of new concrete is to properly form the area. The standard pour depth for concrete is 4 inches.
concrete installation
It is important that the surface is smooth and level. Uneven areas in the ground will require more concrete and thus, increase the cost of the installation.

Once the area has been properly formed and graded the installation of new concrete can begin. We used a 3000-psi concrete with pea gravel for this project. Pea gravel is much easier to work with when stamping concrete.

For this pour we are using an integral color called brick red. Integral color is mixed into the concrete at the plant. This process allows for a more even color throughout the concrete.
Picture
Concrete must be level. In order to achieve this a screed must be used. Screeding concrete will remove excess concrete from higher areas and help fill in lower areas.
Picture
Once the screeding process is completed it is time to begin troweling, floating, and edging the new pour. Floating is the process of smoothing the concrete and helping to remove moisture. As water evaporates from concrete it allows the concrete to firm up and brings us closer to being able to stamp.
Picture
trowing concrete
Picture
Once the concrete has been troweled, floated, and edged, the new concrete will look like this.
Picture
It is at this point that standard concrete would be either machine finished or broom finished. Decorative concrete adds several other steps.

In order to properly stamp concrete the concrete must be firm enough to withstand the pressure of the stamps and the individual(s) standing on the new surface. However it must be wet enough for the impression to take into the concrete.

Before the stamping process begins we spray a release agent onto the concrete. This allows the rubber stamps to pull away without sticking to the concrete. This is very similar to spraying a pan with cooking spray prior to cooking.

Concrete Release Agent
After the concrete has been prepared with the release agent the stamping process can begin.
Stamped Concrete
The rubber mats fit together to form a pattern. After the mats have been placed they are tamped down with a special tool. The tamping process transfers the pattern from the stamps into the concrete.
Concrete Stamping
Brick Concrete Stamp
Specialty tools can be used to correct imperfections that might occur during mat transfer.
Picture
Once the concrete has been stamped we allow it to finish curing over night. Once the concrete has set we move to the finishing stages of the project. These final steps will include color washing and sealing the new concrete.

In order to give the new concrete a more natural look, we use a silicon based coloring agent.
Picture
A small amount of this charcoal color is added to 5 gallons of water.
Picture
The colored mixture is then placed into a watering can and poured directly onto the stamped concrete surface. This process is called color washing. This will add additional color and it will help to antique the finish.
Picture
Picture
After the color washing is complete the concrete will look like this...
Picture
Stamped concrete is never finished until it has been properly sealed. We use an acrylic concrete sealer for all of our decorative concrete installations. The sealer helps protect the concrete as well as adding a “wet” look to the finish.
Picture
Picture
Because this is a commercial installation, we added red quartz sand to the surface. This adds traction and will make the concrete much less slippery. The sand is not visible on the finished product.
Picture
Here is the completed walkway...

Picture
Decorative Concrete
Remember, we have many different style and color options when it comes to stamped concrete designs and decorative concrete. To get a quote on your own decorative concrete project, contact Stone Bond Construction online or call (828) 256-7915.

58 Comments

What Is Epoxy: Understanding the Basics of Stone Bond Epoxy

1/8/2014

3 Comments

 
what is epoxy
What is epoxy? This is one of the most frequently asked questions that we receive at Stone Bond. There are many lengthy and scientific answers to this question but the simple answer is that epoxy is a type of plastic. Stone Bond epoxy is a two-part epoxy that we make from our own proprietary blend. Each kit that we offer, whether in 1-gallon form or in 10-gallon form, comes with equal parts of hardener and resin.

So how does the epoxy work? The liquid hardener and liquid resin do not form epoxy until they are actually blended together. Once equal amounts are combined together, a chemical reaction starts. Because of this chemical reaction, epoxy does not technically dry. Instead of drying the epoxy actually cures. Once the hardener and resin are combined, the mixture will begin to heat. This heating is what allows the epoxy to cure and ultimately become hard.

Because of the chemical reaction that begins when the epoxy resin and the epoxy hardener are combined, there is no way to stop the curing process. Epoxy is also a somewhat finicky material in that it responds differently in hot and cold temperatures. When the winter chill comes, epoxy will become very thick, almost like molasses. However in the heat of summer epoxy can become as thin as water. Because of this, the temperature will dramatically effect the time it takes for epoxy to cure.

For example, if the outside temperature is around 80 degrees, epoxy has a pot life of around 15 minutes. However if the temperature is around 40 degrees, the same epoxy will have a pot life of approximately 25 minutes. This is what makes our 2 part epoxy better. You can mix as little or as much as you desire, depending on the situation.

Stone Bond epoxy is unique from most other epoxies in that it is clear and it mixes with equal parts of each ingredient. Clear epoxy is great for a variety of projects because it does not discolor your base or the materials that you are working with. Being able to mix your epoxy in equal parts is a double bonus because it allows you to mix small quantities and store any un-mixed epoxy until it is needed at a later time.

We have proudly produced our own epoxy since 1993. The same epoxy that we offer to the public is the very same epoxy that we use on a daily basis. Our epoxy can be used in a variety of ways and over the next few weeks we will be showcasing some of the projects that you can tackle on your own. To give you an idea about some of the ways that Stone Bond epoxy can be used here is a quick list:

Epoxy Ideas

* Resurfacing existing epoxy stone decking

* Epoxy Countertops

* Surfacing a tabletop

* Decoupage doors

* Transforming garage floors

These are just a few of the many ways that you can use epoxy. Stay tuned to the Stone Bond epoxy blog to get inspiration for your next DIY project and don’t forget to purchase your epoxy here.


3 Comments
    Picture
    About Stone Bond

    Archives

    November 2016
    May 2015
    April 2015
    September 2014
    May 2014
    April 2014
    March 2014
    January 2014

    Categories

    All
    Backyard
    Cantilever
    Cantilever Pool
    Chip Floor
    Concrete Driveway
    Concrete Stamping
    Concrete Tutorials
    Cracked Concrete
    Curb Appeal
    Decorative Concrete
    DIY Concrete
    DIY Epoxy
    DIY Garage Floor
    Driveway DIY
    Driveway Makeover
    Epoxy Basics
    Epoxy Chip Floor
    Epoxy Floor
    Epoxy Stone
    Garage Floor
    Garage Floor Ideas
    Garden
    Home
    Pool Deck
    Projects
    Spring
    Stamped Concrete
    Transformation
    What Is Epoxy?

    RSS Feed

Proudly Powered by Studio 24 Media Management